
A sluggish PC combined with Task Manager showing your disk pegged at 100% usually points to a specific culprit overworking your drive. Below we walk through the checks and fixes worth trying in Windows 10.
Finding out what is driving disk usage to 100%
Task Manager is the fastest place to start. It shows exactly which process is hammering your drive, which points you toward the fix you need.
Open Task Manager this way:
- Press Ctrl + Shift + Esc to launch it.
- Switch to the Processes tab.
- Click the Disk column header so the heaviest disk users sort to the top.
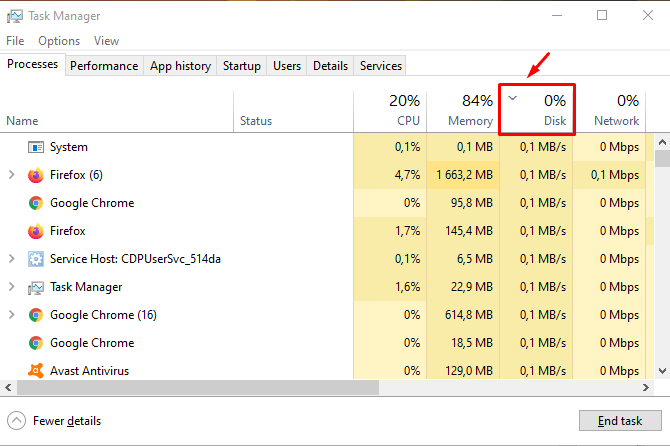
Anything consistently pulling more than 1-2 MB/s from the disk is worth investigating — even a modest, sustained increase in disk activity can slow the whole system down.
Once you have identified a suspect, try these fixes
Fix 1: Shut down background applications
A large number of programs running quietly in the background is a common cause of maxed-out disk usage. You can uninstall the ones you never use, though in most cases simply stopping them from running is enough.
Once Task Manager has pointed you to the offending process, do this:
- Click the process you want to stop.
- Select "End task" at the bottom of the window.
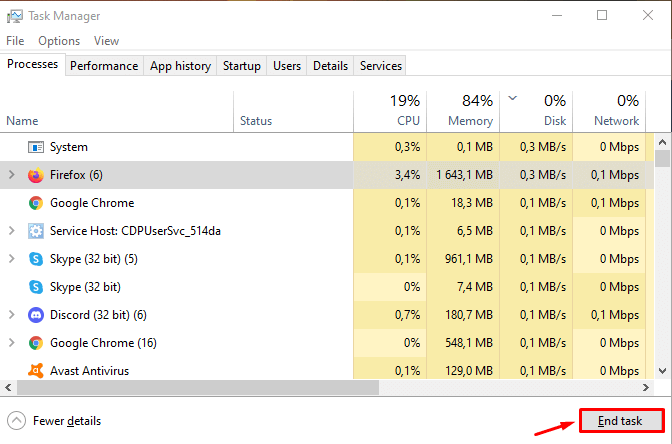
This forces the offending process to close immediately, which should bring your disk usage back down.
Fix 2: Install the latest Windows 10 updates
Installing pending updates often resolves odd, hard-to-diagnose performance issues. Check for updates this way:
- Open the Settings app.
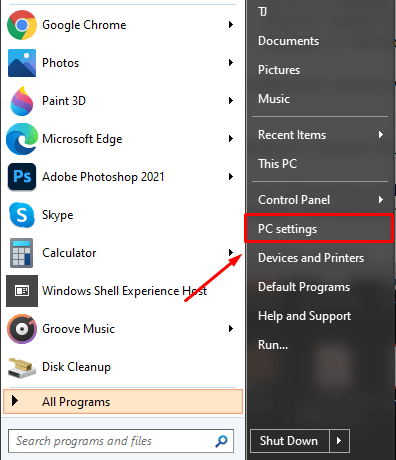
- Select "Update & Security."
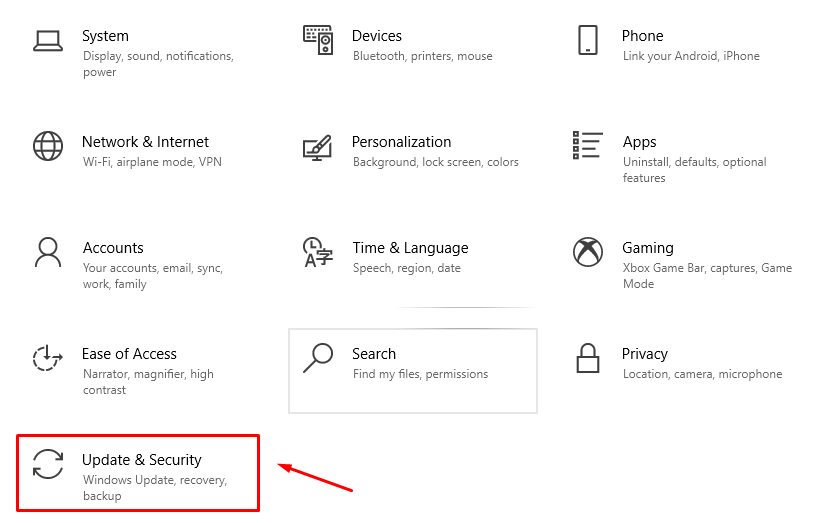
- Go to the "Windows Update" tab.
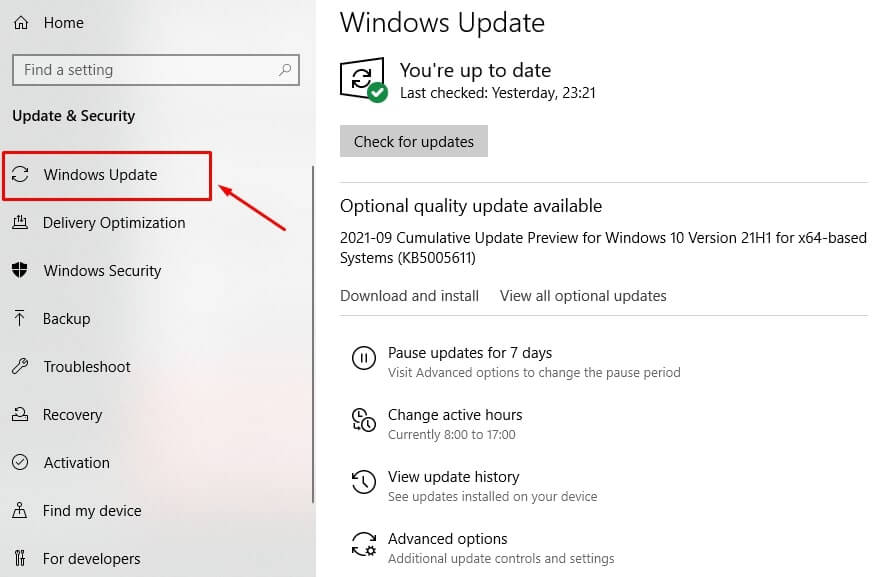
Keeping your system current can improve overall performance, disk behavior included.
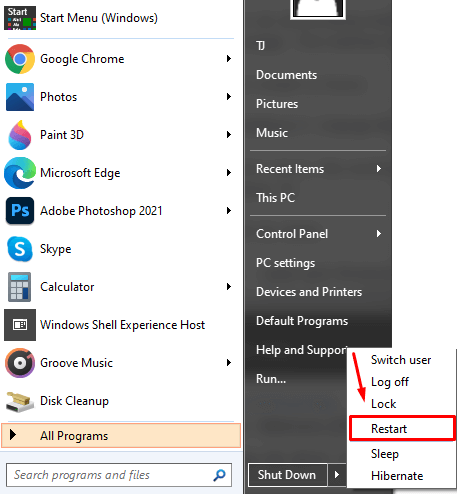
Fix 3: Restart the computer
It sounds too simple, but a reboot clears out a surprising number of Windows 10 glitches, including runaway disk usage — even when it doesn't tell you what actually caused the problem.
Fix 4: Switch to the High Performance power plan
Some balanced or power-saving plans throttle hardware in ways that can make disk issues worse; switching plans has fixed this for some users.
- Open the Start menu and launch Control Panel.
- Go to Hardware and Sound, then Power Options.
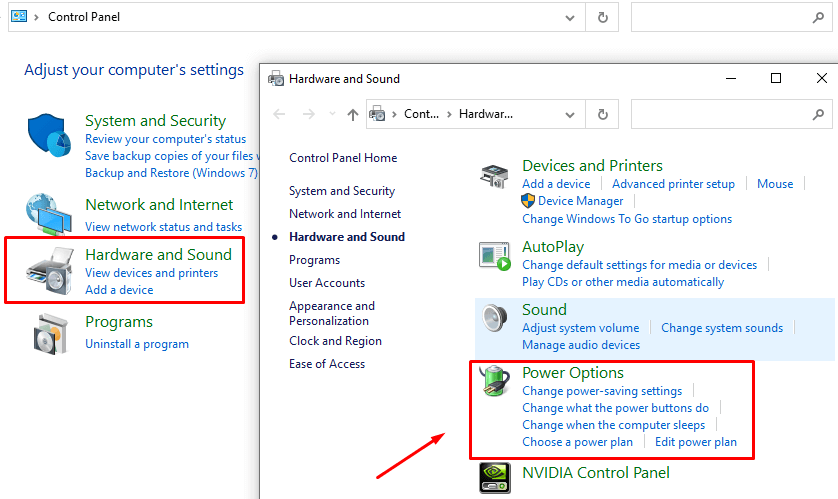
- Click "Change plan settings" next to your current plan.
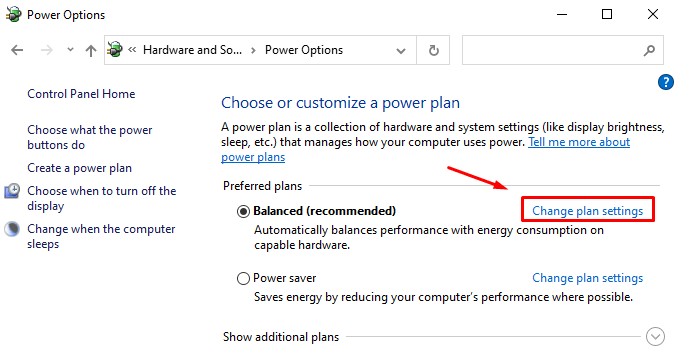
- Click "Change advanced power settings."
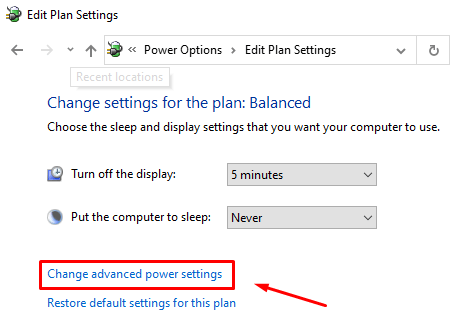
- Choose "High performance" from the plan list.
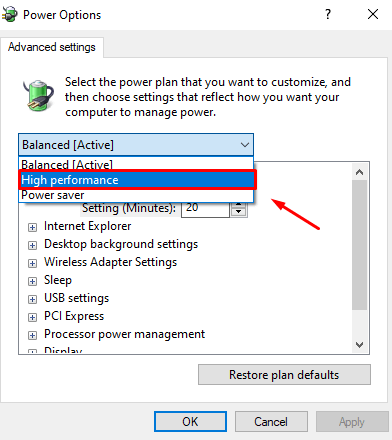
Fix 5: Reset your virtual memory settings
Virtual memory lets Windows treat part of your disk as extra RAM, swapping data in and out through the pagefile.sys file. A corrupted or misconfigured pagefile can drive disk usage to 100%.
Resetting the virtual memory settings usually clears this up:
- Open the Start menu and select "Settings."
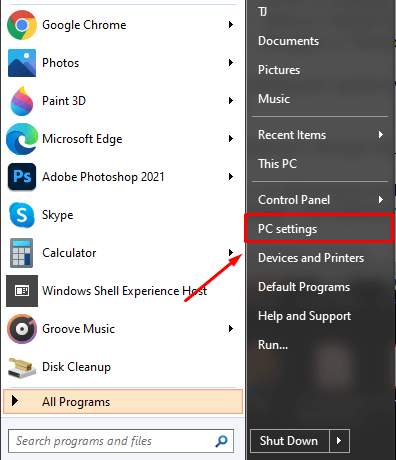
- Click "System."
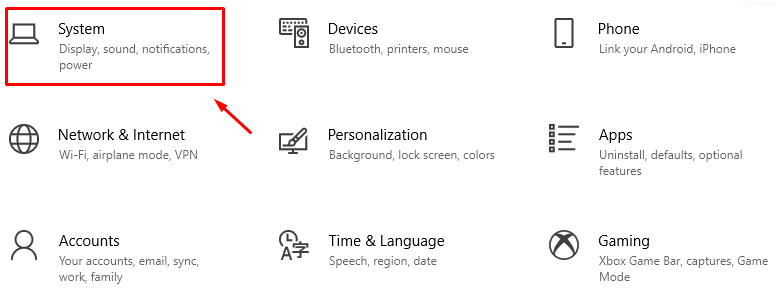
- Scroll to "About" and click "Advanced system settings."
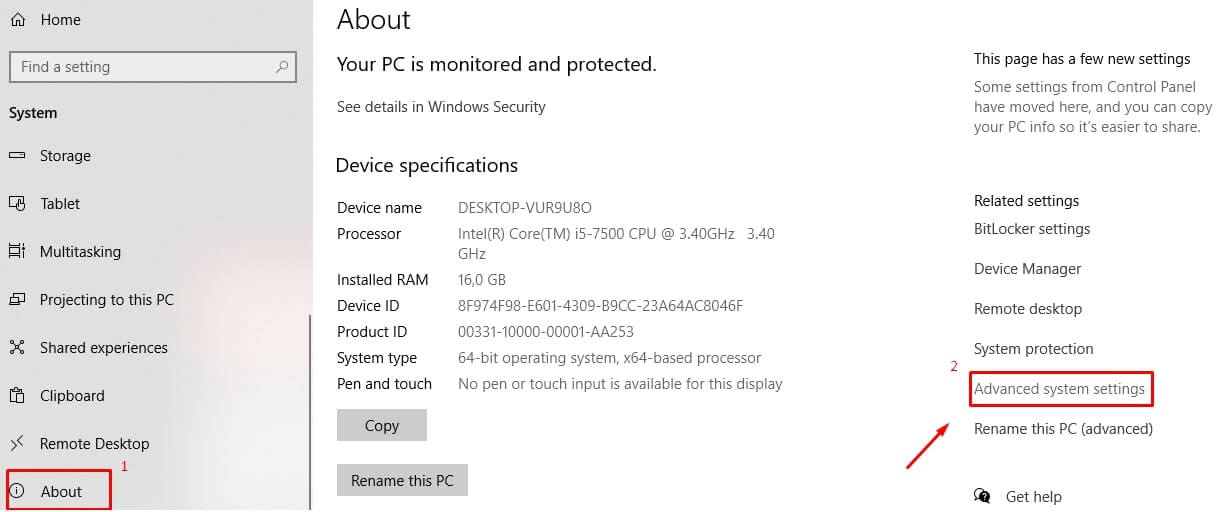
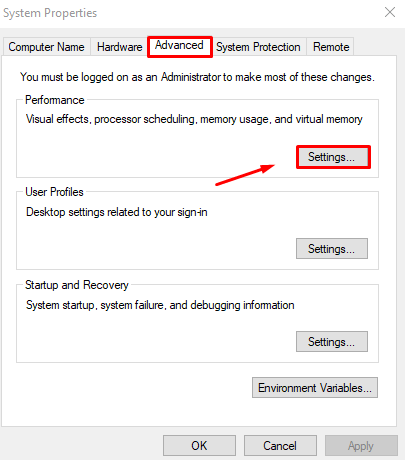
- In the System Properties window, open the Advanced tab and click "Settings" under Performance.
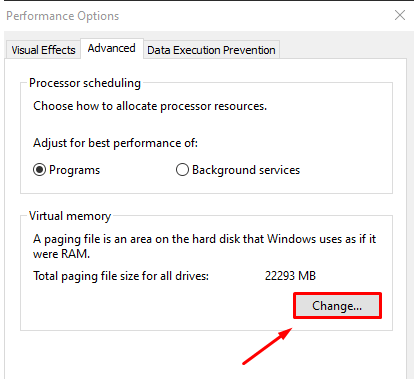
- Open the Advanced tab of the Performance Options window and click "Change."
- Check the box labeled "Automatically manage paging file size for all drives," click OK, and restart your PC. This lets Windows manage the pagefile itself and can ease disk load.
Fix 6: Reset your cloud-sync client
Sync clients such as OneDrive or Dropbox can consume heavy disk resources while syncing, and occasionally get stuck in a loop that keeps hammering the drive long after syncing should have finished.
To reset OneDrive, for example:
- Press Windows key + R to open Run.
- Type
%localappdata%\Microsoft\OneDrive\onedrive.exe /resetand press Enter.
This typically clears the stuck sync state and returns disk usage to normal levels.
Fix 7: Rebuild the Windows Search index
Windows Search relies on a background index of your files and folders so it can return results quickly. That index occasionally becomes corrupted and starts re-scanning endlessly, which can drive disk usage to 100% and drag down performance.
Rebuilding the index usually fixes it:
- Open the Start menu and type
indexinginto the search box.
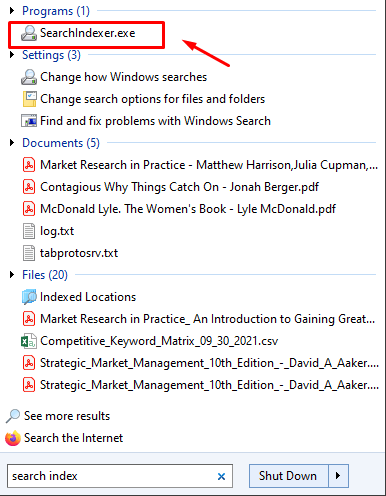
- Open "Indexing Options" from the results, click "Advanced," and select "Rebuild."
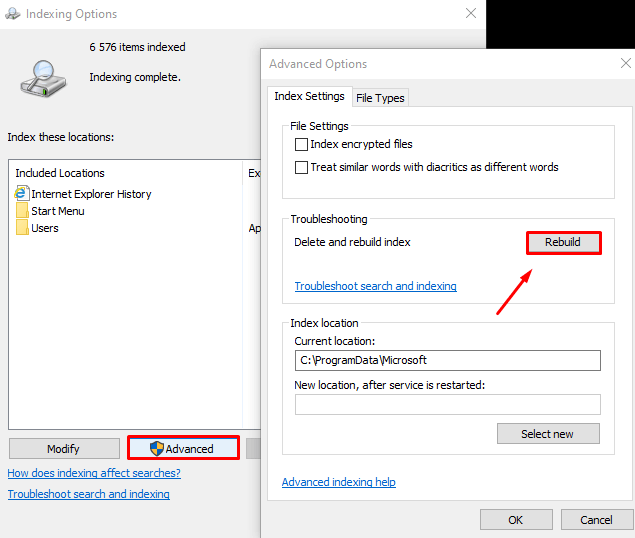
This wipes the existing index and builds a fresh one, clearing out whatever errors were driving disk usage to 100%.
Fix 8: Run a disk check
Windows 10's disk-checking tool can find and repair file system errors that quietly hurt drive performance.
To run a check:
- Press Windows key + R, type
cmd, and click OK. - In the Command Prompt window, type
chkdsk.exe /f /rand press Enter. - Type Y to schedule the check for your next restart. It will run automatically during startup and may take a while to complete.
Fix 9: Stop the SysMain (Superfetch) service
This background service, meant to preload frequently used apps into memory, occasionally misbehaves and drives disk usage up instead.
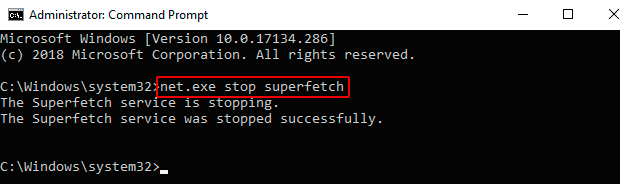
Open the Command Prompt as before and run: net.exe stop superfetch.
Fix 10: Turn off Windows Search
A known bug carried over from Windows 8 can trap Windows Search in a repeating scan loop, which drives disk usage to 100% and noticeably slows the machine.
To turn Windows Search off:
- Open the Command Prompt, as described in Fix 8.
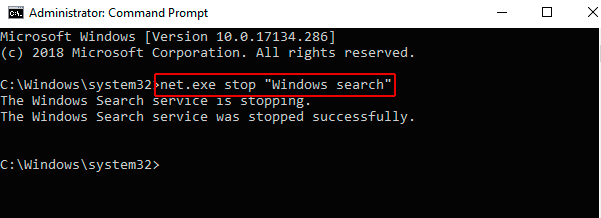
- Run the command
net.exe stop "Windows search".
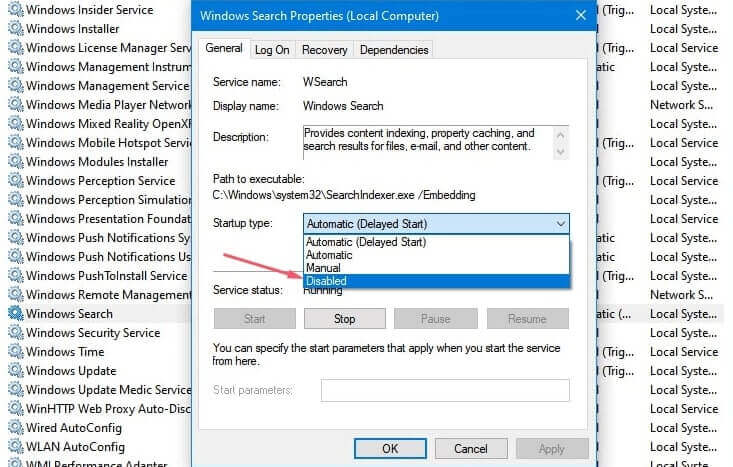
This stops the service until your next restart. If Windows Search turns out to be the real cause of your disk troubles, you can disable it permanently instead:
- Press Windows key + R, type
services.msc, and press Enter. - Find "Windows Search" in the list and double-click it to open its properties.
- Set Startup type to Disabled and click OK.
Fix 11: Clear out temporary files
Clearing your temporary files, a process we cover in more detail elsewhere on this site, can prevent a range of performance issues. Occasionally a buggy process piles up temp files faster than expected, pushing disk usage to 100%.
Clearing them out is worth trying if none of the fixes above solved the problem.
What if the disk usage problem does not go away?
If none of these steps bring your disk usage down, the drive itself may be failing and could need replacing. A healthy drive should not sit at 100% usage for long stretches, so a persistent reading is a real warning sign — ignore it and you risk living with a machine that keeps getting slower.

2 Comments
Vielen Dank für Ihren sehr nützlichen Artikel. Habe bereits den anderen Artikel kopiert. Auch der ist für mich recht nützlich.
Werde mir in Zukunft öfter Ihre Artikel kopieren.
Mit freundlichen Grüßen
R.Rieß
Thank you.