
The Windows Registry is a delicate part of the operating system that stores configuration data for both Windows itself and the applications installed on it. Learning how to create, edit, and remove registry keys gives power users and IT admins fine-grained control over system behavior. That said, this database demands respect — a wrong move can leave your system unstable or unbootable. This guide walks through each of these operations along with the precautions worth taking before you touch anything.
How to create a new Windows Registry key
Adding a new registry key opens the door to deeper system customization. Keep these points in mind before you start:
- Pick the right spot:
- Figure out exactly where in the registry tree the new key belongs. Placing it under the correct parent keeps things organized and makes sure it actually does what you intend.
- Naming matters:
- Give new keys clear, descriptive names so you (or anyone else) can tell what they're for later on.
- Nesting subkeys:
- Rather than always adding keys at the root, you can nest subkeys inside existing ones, which keeps related entries grouped together.
Steps to create a Windows Registry key
- Open Registry Editor:
- Press Windows Key + R, type "regedit", and hit Enter.
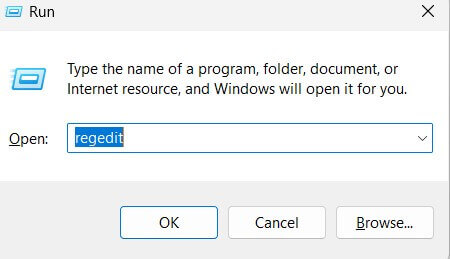
- Press Windows Key + R, type "regedit", and hit Enter.
- Browse to the target location:
- Use the tree on the left to navigate to where the new key should live.
- Right-click and choose "New":
- Right-click the parent key, hover over "New," then select "Key."
- Give it a name:
- Type a name that clearly reflects the key's purpose.
- Confirm with Enter:
- Hit Enter to finalize the new key.
How to edit a Windows Registry key
Editing a registry key lets you tweak system behavior or fix a specific problem, but small mistakes can cause big headaches. Consider the following first:
- Know the value types:
- Registry values can be strings, numbers (DWORD/QWORD), or binary data. Knowing which type you're working with helps you avoid entering the wrong kind of data.
- Editing options vary by type:
- String values can typically be typed in directly, while binary values may need a more specialized editor within Registry Editor.
- Back up first:
- Before editing anything, export a backup of the key (or the whole registry). That way you can restore the original state if something goes wrong.
With those precautions in mind, here's how to actually edit a key:
- Open Registry Editor:
- Press Windows Key + R, type "regedit", and hit Enter.
- Find the key:
- Browse to the exact key you want to change.
- Double-click the entry:
- Double-click the key or value you want to modify.
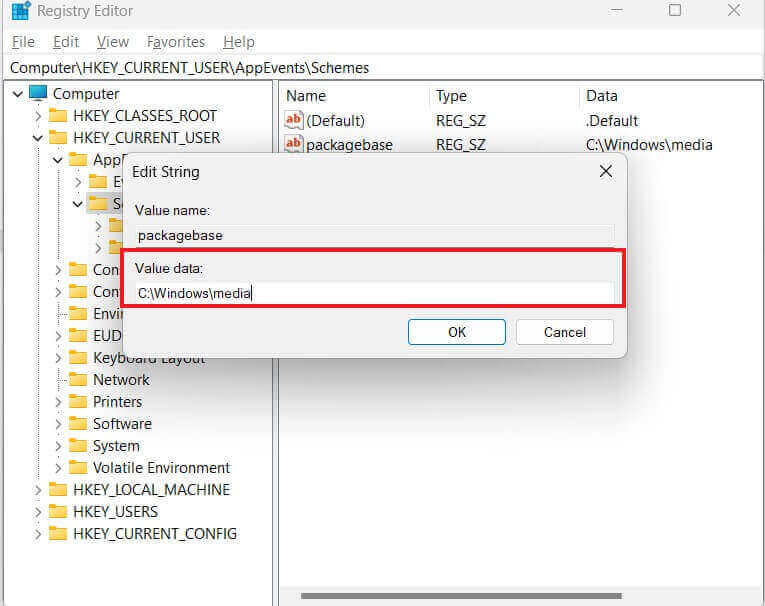
- Double-click the key or value you want to modify.
- Edit the value:
- Type in the new value in the dialog that opens.
- Save it:
- Click "OK" to apply the change.
How to delete a Windows Registry key
Deleting a registry key is riskier than editing one, and it's worth double-checking that the key is truly safe to remove. Keep these things in mind:
- It's recursive:
- Removing a key wipes out every subkey and value nested beneath it too, so the impact can be bigger than it looks at first glance.
- Confirm before you commit:
- Registry Editor will usually ask you to confirm the deletion — treat that prompt as your last chance to double-check.
- Back it up beforehand:
- Export the key (or the full registry) before deleting anything, so you have a way back if the system misbehaves afterward.
Here's the process:
- Open Registry Editor:
- Press Windows Key + R, type "regedit", and hit Enter.
- Locate the key:
- Browse through the tree to find the key you want gone.
- Right-click it:
- Right-click on the target key.
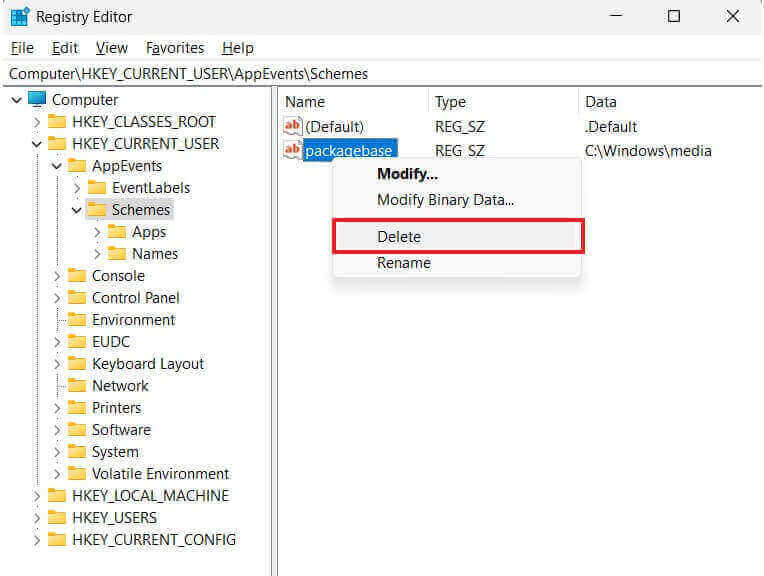
- Right-click on the target key.
- Choose "Delete":
- Click "Delete" and confirm if asked.
- Think twice:
- Once removed, the key is gone for good, so be sure before you confirm.
Summary
The Windows Registry sits at the core of how the OS and your installed programs are configured. Being comfortable creating, editing, and deleting keys opens up a lot of customization and troubleshooting options, but it's not something to do carelessly — a bad edit can destabilize the system or stop Windows from starting altogether. Always export a backup of the registry or the specific key beforehand, and if you're making a change that affects the whole system, it doesn't hurt to get a second opinion from someone experienced first. Treat every registry session as if you were performing surgery: work methodically, verify each step, and avoid making unrelated changes at the same time so any issues are easy to trace back.

1 Comment
Great article! Working with the registry can be a daunting task, but thanks to this article, I now have a clear understanding of how to edit, delete and create keys. Thank you so much for the detailed instructions and clear explanation of the process!